Wednesday, 10 February 2016

Simple Data Binding in Universal Windows Platform

What is Data Binding?
 Data binding is a technique used to make dependent one item to the other item. Either source (User) is dependent on target (Server) or either target is dependent on source or either both are dependent to each others.
The change in one item will also change the second item.

Data Binding Types:
i- One way binding => Only One item is dependent to the other item.
ii- Two way binding =>  Both first and the second items are dependent to each other.
In logical words, in One way binding Server can change the User form or whtaever the user is accessing while in two way binding both can access each other whatever they are accessing.

Here in this example we are going to implement just one way binding, we will also talk about two way binding in the next tutorial.

Example:
 In this example we will make a slider in our "MainPage.xaml" and a one image. we will bind image height with the slider. As we will increase slider volume the height of picture will be increased accordingly. So let's start with the new project.

  • Click on the "New Project" in the start screen.


  • Under "Visual C#" click on Windows => Universal then click on "Blank App" and name your blank app.


  • After creating Blank app double click on "MainPage.xaml" in the solution explorer. This will open Designer and Xaml. in the Design you can simply drag and drop items from toolbox in the menu and in the Xaml you simply write the code your own.


  • You can split your windows as you want by just clicking at bottom windows splitter icons as you can see in the picture.


  • Now drag the image from your computer and drop it on the "Assets" in the solution explorer window.

  • Now in the "MainPage.xaml" , open xaml and here we create on slider and one image tag.


  • Here we put image and slider in "Stack Panel". The reason is that stack panel organize the sequence of your controls in the center and also align them horizontally and vertically.

  •  In the image tag we bind the height of image with the slider where "saqib" is the name of the slider. Also we provide the source of the image that is in our "Assets" folder and the name of the image is "Superior_University.jpg".

  •  "ElementName" in the image tag is the control name with which you want to bind the current control or image.
  • Slider has a minimum and maximum value. By default maximum value is equals to 100.
Output:
 On increasing the Slider value...


On decreasing the value of slider...


So actually as we increase the slider value the greater will be the image height. we bind the image height with the slider value.

Tuesday, 2 February 2016

Professional Useful Visual Studio Features & Shortcuts.

Visual Studio Features and shortcuts are very important when you are developing in visual studio. These Features helps in developing faster. These shortcuts & features will enhance your interaction with visual studio and will make you life easier.  
  •  Lets Start with Start Page of visual studio. On the top of start Page there is option "Send Feedback". by Selecting Send feedback option you can either "send feedback", either you can "report any problem" related to visual studio and either you can "rate the product". Here in the Screenshot you can find this option very easily.
Start Page
         

  •    Task List ____ Task List specify the tasks that you have to perform later or you have saved as a reminder what you will perform on next day.

      From the Menu go to "View" ------> "Task List" or (Ctrl+\, T)
     
How to assign Tasks for yourself or anyone else in visual studio?


//TODO syntax the tasks that you have to perform and then you can see those tasks in "Tasks List".


  • Set window Layout ___ You can set the windows environment that you want to set for yourself. You can save that layout and that layout will be open whenever you start working.
Simply open the windows that you want to see always to be open like i have opened "Toolbox" in the left side. At the right side i set "solution explorer" window and at the middle i have set the coding window. After setting window click on windows tab in the menu and the "Save Window Layout". Shortcut for saving window Layout. (Ctrl+Alt+1)


Now after saving the window layout this will be default layout for your visual studio.


  • #Region ___ #region is used in the code to specify your code in blocks.
Lets suppose i want to make block of class separate and methods block separate.


#region is the starting syntax and #endregion is the ending syntax. With the Starting syntax you can specify the name of particular region. i the snippet i have 2 regions one with the name "Class" and other with the name "mymethods".
The advantage of using #region is that you can expand or collapse that particular region when there will be hundreds of methods and classes. #region will be the useful for specifying your code into different blocks.

  • Toggle Your Code ____ You can expand or collapse your desired selected lines with the shortcut keys.
 =>   Ctrl+M+H, Ctrl+M+U
 Select some line of code and then try these shortcuts.

  • Shifting the Tabs ____ You can open the desired tab open in your visual studio following these shortcuts. This shortcut will be helpful when there are different tabs open in the visual studio.
 =>  Ctrl++,  Ctrl+-

  • The Bulb ___ The bulb helps you to define the expected methods for your variable. e.g,  select the line from code & then press Ctrl+. this will give you some hints that you may be interested to define for your code.


i select "private int name" then press Ctrl+. this is asking me to generate constructor or encapsulation. when you hit enter on constructor or encapsulation this will add the functionality of constructor or encapsulation.

  • increase or decrease font size ____ You can increase or decrease the size of your code as:
=>   Ctrl+Shift+.    ,          Ctrl+Shift+,

  • Move Line ___ You can move the selected line or where cursor blinking you can move that line to downward direction or upward direction.
Try this shortcut to move the line upward or downward.
=>   Ctrl+ Line
Line means upward of downward arrow on your keyboard.

  • Navigate To ____ You can navigate to any other page that you want to open in visual Studio.
Ctrl+,

  • Reuse your Code ____ You can reuse the code without having to type over and over again
  • žPlace it in a toolbox under one of the sections or create your own one

  • žDrag and drop as required


Once your code is added to toolbox then you can use that code every project everywhere, simply drag and drop that code from toolbox in the desired code where you want to add that. 
  •  You can also rename that code in the toolbox.

  • Intellisense ___ While typing words in visual studio code you can auto complete the word by using intellisense. While write just enter:
=> Ctrl+Space

  • Quick Launch ____ Quick launch is the most beautiful feature of visual studio that let you to add the functionality that you don't remember. For example, you don't remember where that feature is present in visual studio. 
  • Simply Press (Ctrl+Q) and then type the desired feature name or just hint about that feature. Syntax for using Quick launch is:
=>In the search bar type "@opt desired_feature_name". e.g: 


  • Formatting ___ using this shortcut the visual studio coding format will be according to the preferred visual studio format.
=> Ctrl+K, D

  • Propfull ___ Use this keyword while typing access specifier in your code. Access specifiers are public, private and protected keywords. Using of propfull will create access specifiers and getter setter for us automatically.
=> Type Propfull+tab+tab

  • Vertically Selection _____ Select the text vertically, just press Alt and select the code.
          
              These are some important features and shortcuts for visual studio during development that are most important to make your whole life easier. For more features or shortcuts you may comment me on the article simply and i will catch you all. :)

Friday, 29 January 2016

SQL2- Table Creation in SQL server/Database Management System

A database consist of Tables, A table contain rows and columns, Columns contains the related information of specific item. A row contains columns information.

 In database, Columns are also known as "field" and rows as "records".
                    
      Lets create our first database which will contain one table with the name "Users_Table".
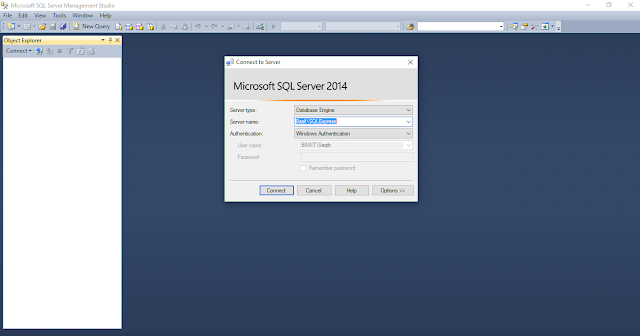
  • Open SQL server that you have installed on your machine. The first Screen looks like this.
      

  •  Enter your server name and the click on "connect".
  • after connecting your database engine right click on Databases in the object explorer. 


  • Enter your new database name, suppose we are creating our database with the name "User_Registration".


  • Under the databases folder our new database is created with the name "User_Registration".
  • Expand the User_Registration database in which our database contains the folder "Tables".
  • Right click on Tables and click on Table to create new table.


  • Now enter the desired column name under which you want to store your data.
  • Here we created four columns. These columns will contain related data with the name specified.


  • Whenever you create the table you must put first column for "id" and set "Primary Key" on id by right clicking on the id. id is a unique identifier because we set "Primary Key" on it which identify each individual record or row in a table.
  • id should have a data type integer (int).
  • Notice that other columns field contain data type "varchar(50)". varchar specify that every type of data can be input in the field either numeric values or either alphabetic values.
  • where 50 is the size of field. it can contain 50 characters.
  • One more important thing to be notice that at a time when you set primary key on the id there must be auto increment on id. There is "columns properties" on the bottom.
  • Click on "U_id" & in the column properties there is "identity specifications". expand "identity specification" and set (is identity) to "yes".

 
Identity Specification:
  This will increment in the id automatically whenever you enter individual record.

Identity Seed:
  identity seed is the option where you can provide your desired initial number from where you want to store record.

Identity Increment:
identity increment is the option where you set a value that tells how much increment you want in every record.

 Here we start storing record in U_id with a initial value of 1 which we specify in identity seed and we put a increment of 1 in the User_id.

  • Last step is to save the table with the desired name. By pressing Ctrl+S we save it with the name "Users_Table".


Thursday, 28 January 2016

SQL1- How to Create Databse in Microsoft SQL server


What is SQL Server?

SQL server is a Software From Microsoft to develop database. A database is a set of records  which we store using SQL server tools and techniques. SQL server is a database management system.

What is SQL?

SQL Stands for "Structure Query Language", is a programming language to store and manage database records. By writing SQL Queries we usually can perform four core "CRUD" operation, Which are:
  • Create __  To create the database.
  • Read __     To retrieve the records from database.
  • Update __   To update the data in database.
  • Delete __    To delete the data from database.
  SQL is very easy to learn. SQL Queries help to perform "CRUD" operations and other outstanding operations as well.

Before Creating databases, Download SQL Server  From Microsoft Official site.You can also download the setup from the following link:
                https://www.microsoft.com/en-us/server-cloud/products/sql-server/

 After download and installing SQL server now we are able to work with SQL server and can create the database. In the next tutorial we will create our first database using SQL Server.